 by
by Manicures are cosmetic treatments that you do on your nails to make them look more beautiful, attractive, and expressive. They can also help you improve your nail health and hygiene. There are many types and styles of manicures that you can choose from based on your preference and suitability. Some of the most popular ones are French manicure, ombre manicure, gradient manicure, etc. But how do you do these manicures at home or at a salon? In this article, we will show you how to do a French manicure, an ombre manicure, a gradient manicure, etc. We will also show you what are the features and variations of these manicures. We will also show you what are the steps and techniques that you need to follow to do these manicures. We will also show you what are the tips and tricks that you need to know to do these manicures more easily and beautifully.
What are manicures and why they are popular
Manicures are cosmetic treatments that you do on your nails to make them look more beautiful,attractive, and expressive. They usually involve applying, removing, shaping, painting, or decorating your nails with different products and tools. They can also involve treating, moisturizing, or massaging your nails and cuticles with different products and tools.
Manicures are popular because they can:
- Enhance your appearance: Manicures can enhance your appearance by making your nails look more beautiful, attractive, and expressive. They can also complement or contrast with your outfit, jewelry, or makeup.
- Express your personality and mood: Manicures can express your personality and mood by allowing you to choose different types, styles, colors, or designs of manicures. They can also reflect your interests, hobbies, preferences, or emotions.
- Improve your health and hygiene: Manicures can improve your health and hygiene by keeping your nails clean, healthy, strong, and beautiful. They can also prevent or treat any nail problems or issues that you might have, such as dryness, brittleness, splitting, infection, etc.
What are the different types and styles of manicures
There are many types and styles of manicures that you can choose from based on your preference and suitability. Some of the most popular ones are:
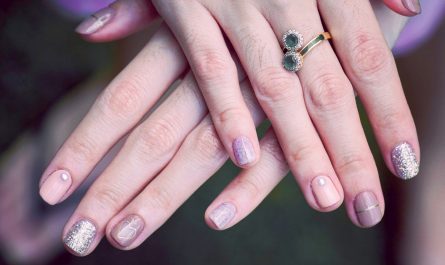
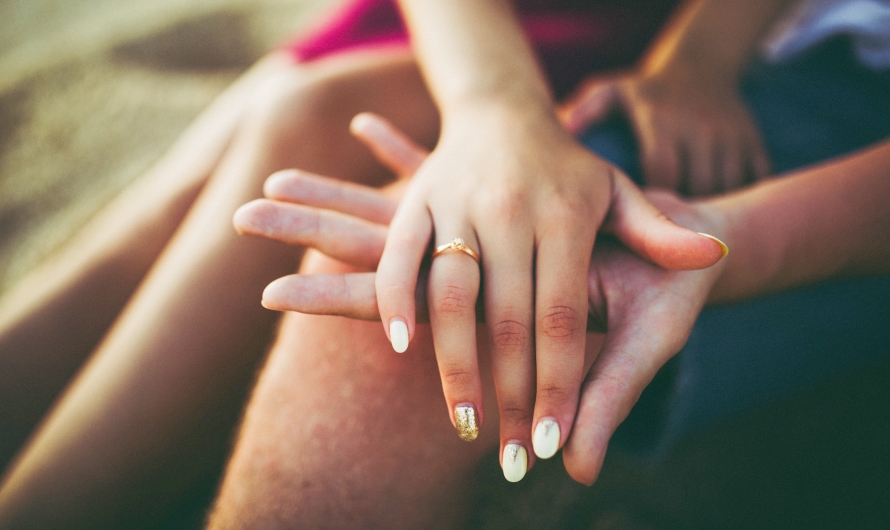
- French manicure: This is a type of manicure that involves painting the tips of your nails with a white color and the rest of your nails with a nude or pink color. It can make your nails look more elegant, classic, and natural.
- Ombre manicure: This is a type of manicure that involves painting your nails with a gradient of colors that fade from one to another. It can make your nails look more trendy, modern, and creative.
- Gradient manicure: This is a type of manicure that involves painting each of your nails with a different color that forms a gradient from one finger to another. It can make your nails look more colorful, fun, and playful.
How to Do a French Manicure
A French manicure is a type of manicure that involves painting the tips of your nails with a white color and the rest of your nails with a nude or pink color. It can make your nails look more elegant, classic, and natural. Here is how to do a French manicure:
- Step 1: Gather your products and tools. You will need some products and tools to do a French manicure. You will need some nail polish in white, nude or pink colors. You will also need some nail polish remover, cotton pads or swabs, base coat, top coat,nail file, nail clipper, cuticle oil, and hand cream.
- Step 2: Clean your nails. You will need to clean your nails before doing a French manicure. You can use a nail brush or a toothbrush and some soap or water to scrub off any dirt or residue on your nails. You can also use a cotton pad or a cotton swab and some nail polish remover to wipe off any oil or polish on your nails.
- Step 3: Shape your nails. You will need to shape your nails according to your preference and suitability. You can use a nail file or a scissors to shape your nails into different forms and sizes, such as almond, oval, square, coffin, short, medium, long, etc. For a French manicure, it is recommended to shape your nails into a square or oval form and a medium or long size.
- Step 4: Trim your nails. You will need to trim your nails according to your preference and suitability. You can use a nail clipper or a scissors to trim your nails into different lengths and thicknesses, such as short, medium, long, thin, thick, etc. For a French manicure, it is recommended to trim your nails into a medium or long length and a thin or medium thickness.
- Step 5: Apply base coat. You will need to apply base coat to protect and prepare your nails for the nail polish. You can use any type of base coat that suits your nail type and preference. You should apply base coat in thin and even coats, starting from the base of the nail and ending at the tip. You should also let the base coat dry completely before applying the next coat.
- Step 6: Apply white nail polish on the tips of your nails. You will need to apply white nail polish on the tips of your nails to create the French manicure effect. You can use any type of white nail polish that suits your nail type and preference. You should apply white nail polish in thin and even coats, starting from the edge of the nail and ending at the tip. You should also let the white nail polish dry completely before applying the next coat.
- Step 7: Apply nude or pink nail polish on the rest of your nails. You will need to apply nude or pink nail polish on the rest of your nails to complete the French manicure effect. You can use any type of nude or pink nail polish that suits your nail type and preference. You should apply nude or pink nail polish in thin and even coats, starting from the base of the nail and ending at the tip. You should also let the nude or pink nail polish dry completely before applying the next coat.
- Step 8: Apply top coat. You will need to apply top coat to seal and protect your nail polish. You can use any type of top coat that suits your nail type and preference. You should apply top coat in thin and even coats, starting from the base of the nail and ending at the tip. You should also let the top coat dry completely before touching or using your nails.
- Step 9: Apply cuticle oil and hand cream. You will need to apply cuticle oil and hand cream to moisturize and soothe your nails and hands after doing a French manicure. You can use any type of cuticle oil and hand cream that suits your skin type and preference. You should apply cuticle oil on your cuticles and around your nails
and massage them gently. You should also apply hand cream on your hands and nails and massage them gently.
Some examples of French manicure variations and trends are:
- Reverse French manicure: This is a variation of French manicure that involves painting the base of your nails with a white color and the rest of your nails with a nude or pink color. It can make your nails look more modern, edgy, and chic.
- Colored French manicure: This is a variation of French manicure that involves painting the tips of your nails with a different color than white, such as black, red, blue, etc. It can make your nails look more colorful, fun, and playful.
- Glitter French manicure: This is a variation of French manicure that involves adding some glitter or sparkle to your tips or your entire nails. It can make your nails look more glamorous, festive, and dazzling.
Tips and tricks for doing a French manicure more easily and beautifully
Here are some tips and tricks that can help you do a French manicure more easily and beautifully:
- To paint the tips of your nails more easily, you can use some tape or stickers to create a guide or a stencil for your white nail polish. You can also use a thin brush or a dotting tool to draw the line or the curve for your white nail polish.
- To paint the tips of your nails more beautifully, you can choose the right color, shape, and size for your white nail polish. You can also adjust the thickness or the angle of your white nail polish according to your nail shape and size.
- To make your French manicure last longer, you can use a high-quality nail polish that has good pigmentation, coverage, and durability. You can also use a good base coat and top coat that can protect and seal your nail polish. You can also avoid using harsh chemicals or products that can damage or stain your nail polish.
How to Do an Ombre Manicure
An ombre manicure is a type of manicure that involves painting your nails with a gradient of colors that fade from one to another. It can make your nails look more trendy, modern, and creative. Here is how to do an ombre manicure:
- Step 1: Gather your products and tools. You will need some products and tools to do an ombre manicure. You will need some nail polish in two or more colors that form a gradient. You will also need some nail polish remover, cotton pads or swabs, base coat, top coat,a makeup sponge, a plastic sheet, a toothpick, cuticle oil, and hand cream.
- Step 2: Clean your nails. You will need to clean your nails before doing an ombre manicure. You can use a nail brush or a toothbrush and some soap or water to scrub off any dirt or residue on your nails. You can also use a cotton pad or a cotton swab and some nail polish remover to wipe off any oil or polish on your nails.
- Step 3: Shape your nails. You will need to shape your nails according to your preference and suitability. You can use a nail file or a scissors to shape your nails into different forms and sizes, such as almond, oval, square, coffin, short, medium, long, etc.
- Step 4: Trim your nails. You will need to trim your nails according to your preference and suitability. You can use a nail clipper or a scissors to trim your nails into different lengths and thicknesses, such as short, medium, long, thin, thick, etc.
- Step 5: Apply base coat. You will need to apply base coat to protect and prepare your nails for the nail polish. You can use any type of base coat that suits your nail type and preference. You should apply base coat in thin and even coats, starting from the base of the nail and ending at the tip. You should also let the base coat dry completely before applying the next coat.
- Step 6: Apply the first color of nail polish on your entire nails. You will need to apply the first color of nail polish on your entire nails to create the base for the ombre effect. You can use any type of nail polish that suits your nail type and preference. You should apply the first color of nail polish in thin and even coats, starting from the base of the nail and ending at the tip. You should also let the first color of nail polish dry completely before applying the next coat.
- Step 7: Apply the second color of nail polish on a makeup sponge. You will need to apply the second color of nail polish on a makeup sponge to create the ombre effect. You can use any type of nail polish that suits your nail type and preference. You should apply the second color of nail polish in a thin and even layer on one edge of the makeup sponge.
- Step 8: Apply the third color of nail polish on the same makeup sponge. You will need to apply the third color of nail polish on the same makeup sponge to create the ombre effect. You can use any type of nail polish that suits your nail type and preference. You should apply the third color of nail polish in a thin and even layer on another edge of the makeup sponge.
- Step 9: Blend the colors on the makeup sponge with a toothpick. You will need to blend the colors on the makeup sponge with a toothpick to create the ombre effect. You can use any type of toothpick that suits your preference and convenience. You should use the toothpick to gently mix and swirl the colors on the makeup sponge until they form a smooth and seamless gradient.
- Step 10: Dab the makeup sponge on your nails. You will need to dab the makeup sponge on your nails to transfer the ombre effect. You can use any type of makeup sponge that suits your preference and convenience. You should dab the makeup sponge on your nails lightly and repeatedly until you achieve the desired ombre effect. You should also dab the makeup sponge on a plastic sheet in between each dab to remove any excess nail polish.
- Step 11: Apply top coat. You will need to apply top coat to seal and protect your nail polish. You can use any type of top coat that suits your nail type and preference. You should apply top coat in thin and even coats, starting from the base of the nail and ending at the tip. You should also let the top coat dry completely before touching or using your nails.
- Step 12: Apply cuticle oil and hand cream. You will need to apply cuticle oil and hand cream to moisturize and soothe your nails and hands after doing an ombre manicure. You can use any type of cuticle oil and hand cream that suits your skin type and preference. You should apply cuticle oil on your cuticles and around your nails and massage them gently. You should also apply hand cream on your hands and nails and massage them gently.
Some examples of ombre manicure variations and trends are:
- Monochrome ombre manicure: This is a variation of ombre manicure that involves using different shades of the same color to create the ombre effect. It can make your nails look more sophisticated, elegant, and classy.
- Rainbow ombre manicure: This is a variation of ombre manicure that involves using different colors of the rainbow to create the ombre effect. It can make your nails look more colorful, fun, and playful.
- Glitter ombre manicure: This is a variation of ombre manicure that involves adding some glitter or sparkle to your nails to create the ombre effect. It can make your nails look more glamorous, festive, and dazzling.
Tips and tricks for doing an ombre manicure more easily and beautifully
Here are some tips and tricks that can help you do an ombre manicure more easily and beautifully:
- To create the ombre effect more easily, you can use a makeup sponge that has a smooth, soft, and porous surface that can blend and transfer the colors well. You can also use a plastic sheet or a paper plate that has a flat, smooth, and non-sticky surface that can remove any excess nail polish well.
- To create the ombre effect more beautifully, you can choose the right colors, gradient, and effect for your nails. You can also adjust the intensity or the contrast of your colors according to your nail shape and size.
- To make your ombre manicure last longer, you can use a high-quality nail polish that has good pigmentation, coverage, and durability. You can also use a good base coat and top coat that can protect and seal your nail polish. You can also avoid using harsh chemicals or products that can damage or stain your nail polish.
How to Do a Gradient Manicure
A gradient manicure is a type of manicure that involves painting each of your nails with a different color that forms a gradient from one finger to another. It can make your nails look more colorful, fun, and playful. Here is how to do a gradient manicure:
- Step 1: Gather your products and tools. You will need some products and tools to do a gradient manicure. You will need some nail polish in two or more colors that form a gradient. You will also need some nail polish remover, cotton pads or swabs, base coat, top coat, nail file, nail clipper, cuticle oil, and hand cream.
- Step 2: Clean your nails. You will need to clean your nails before doing a gradient manicure. You can use a nail brush or a toothbrush and some soap or water to scrub off any dirt or residue on your nails. You can also use a cotton pad or a cotton swab and some nail polish remover to wipe off any oil or polish on your nails.
- Step 3: Shape your nails. You will need to shape your nails according to your preference and suitability. You can use a nail file or a scissors to shape your nails into different forms and sizes, such as almond, oval, square, coffin, short, medium, long, etc.
- Step 4: Trim your nails. You will need to trim your nails according to your preference and suitability. You can use a nail clipper or a scissors to trim your nails into different lengths and thicknesses, such as short, medium, long, thin, thick, etc.
- Step 5: Apply base coat. You will need to apply base coat to protect and prepare your nails for the nail polish. You can use any type of base coat that suits your nail type and preference. You should apply base coat in thin and even coats, starting from the base of the nail and ending at the tip. You should also let the base coat dry completely before applying the next coat.
- Step 6: Apply the first color of nail polish on your thumb. You will need to apply the first color of nail polish on your thumb to create the gradient effect. You can use any type of nail polish that suits your nail type and preference. You should apply the first color of nail polish in thin and even coats, starting from the base of the nail and ending at the tip. You should also let the first color of nail polish dry completely before applying the next coat.
- Step 7: Apply the second color of nail polish on your index finger. You will need to apply the second color of nail polish on your index finger to create the gradient effect. You can use any type of nail polish that suits your nail type and preference. You should apply the second color of nail polish in thin and even coats, starting from the base of the nail and ending at the tip. You should also let the second color of nail polish dry completely before applying the next coat.
- Step 8: Apply the third color of nail polish on your middle finger. You will need to apply the third color of nail polish on your middle finger to create the gradient effect. You can use any type of nail polish that suits your nail type and preference. You should apply the third color of nail polish in thin and even coats, starting from the base of the nail and ending at the tip. You should also let the third color of nail polish dry completely before applying the next coat.
- Step 9: Apply the fourth color of nail polish on your ring finger. You will need to apply the fourth color of nail polish on your ring finger to create the gradient effect. You can use any type of nail polish that suits your nail type and preference. You should apply the fourth color of nail polish in thin and even coats, starting from the base of the nail and ending at the tip. You should also let the fourth color of nail polish dry completely before applying the next coat.
- Step 10: Apply the fifth color of nail polish on your pinky finger. You will need to apply the fifth color of nail polish on your pinky finger to create the gradient effect. You can use any type of nail polish that suits your nail type and preference. You should apply the fifth color of nail polish in thin and even coats, starting from the base of the nail and ending at the tip. You should also let the fifth color of nail polish dry completely before touching or using your nails.
- Step 11: Apply top coat. You will need to apply top coat to seal and protect your nail polish. You can use any type of top coat that suits your nail type and preference. You should apply top coat in thin and even coats, starting from the base of the nail and ending at the tip. You should also let the top coat dry completely before touching or using your nails.
- Step 12: Apply cuticle oil and hand cream. You will need to apply cuticle oil and hand cream to moisturize and soothe your nails and hands after doing a gradient manicure. You can use any type of cuticle oil and hand cream that suits your skin type and preference. You should apply cuticle oil on your cuticles and around your nails and massage them gently. You should also apply hand cream on your hands and nails and massage them gently.
Some examples of gradient manicure variations and trends are:
- Monochrome gradient manicure: This is a variation of gradient manicure that involves using different shades of the same color to create the gradient effect. It can make your nails look more sophisticated, elegant, and classy.
- Rainbow gradient manicure: This is a variation of gradient manicure that involves using different colors of the rainbow to create the gradient effect. It can make your nails look more colorful, fun, and playful.
- Glitter gradient manicure: This is a variation of gradient manicure that involves adding some glitter or sparkle to your nails to create the gradient effect. It can make your nails look more glamorous, festive, and dazzling.
Tips and tricks for doing a gradient manicure more easily and beautifully
Here are some tips and tricks that can help you do a gradient manicure more easily and beautifully:
- To create the gradient effect more easily, you can use a nail polish that has good pigmentation, coverage, and blendability that can form a smooth and seamless gradient. You can also use a nail polish that has a similar formula, texture, or finish that can match well with each other.
- To create the gradient effect more beautifully, you can choose the right colors, direction, and transition for your nails. You can also adjust the number or the order of your colors according to your nail shape and size.
- To make your gradient manicure last longer, you can use a high-quality nail polish that has good pigmentation, coverage, and durability. You can also use a good base coat and top coat that can protect and seal your nail polish. You can also avoid using harsh chemicals or products that can damage or stain your nail polish.
Conclusion
Manicures are cosmetic treatments that you do on your nails to make them look more beautiful, attractive, and expressive. They can also help you improve your nail health and hygiene. There are many types and styles of manicures that you can choose from based on your preference and suitability. Some of the most popular ones are French manicure, ombre manicure, gradient manicure, etc. By following the steps and techniques that we have provided in this article, you can do these manicures at home or at a salon. By following the tips and tricks that we have provided in this article, you can do these manicures more easily and beautifully.
FAQs
- Q: How can I learn more about manicures?
- A: There are many ways that you can learn more about manicures, such as watching online tutorials, reading blogs or magazines, taking online courses, or joining online communities. You can also visit a nail salon or a nail technician and ask for advice or inspiration from the professionals.
- Q: How can I make my manicures more unique and original?
- A: There are some ways that you can make your manicures more unique and original, such as using your own creativity and imagination, mixing and matching different types and styles of manicures, adding personal touches or details, or customizing your manicures according to your preferences.
- Q: How can I take care of my nails after doing manicures?
- A: There are some ways that you can take care of your nails after doing manicures, such as moisturizing your nails and cuticles regularly, avoiding biting or picking your nails, wearing gloves when doing household chores, or using a nail strengthener or a nail oil.
- Q: How can I change my manicures without removing them?
- A: There are some ways that you can change your manicures without removing them, such as applying a different color or type of top coat over your existing manicures, adding some stickers, gems, foils, or other materials over your existing manicures, or using a nail art pen or a brush to draw patterns or outlines over your existing manicures.
- Q: How can I save money on doing manicures?
- A: There are some ways that you can save money on doing manicures, such as doing it yourself at home instead of going to a salon, using affordable and quality products and tools, reusing or recycling your products and tools, or using natural or homemade products and tools.