 by
by Introduction
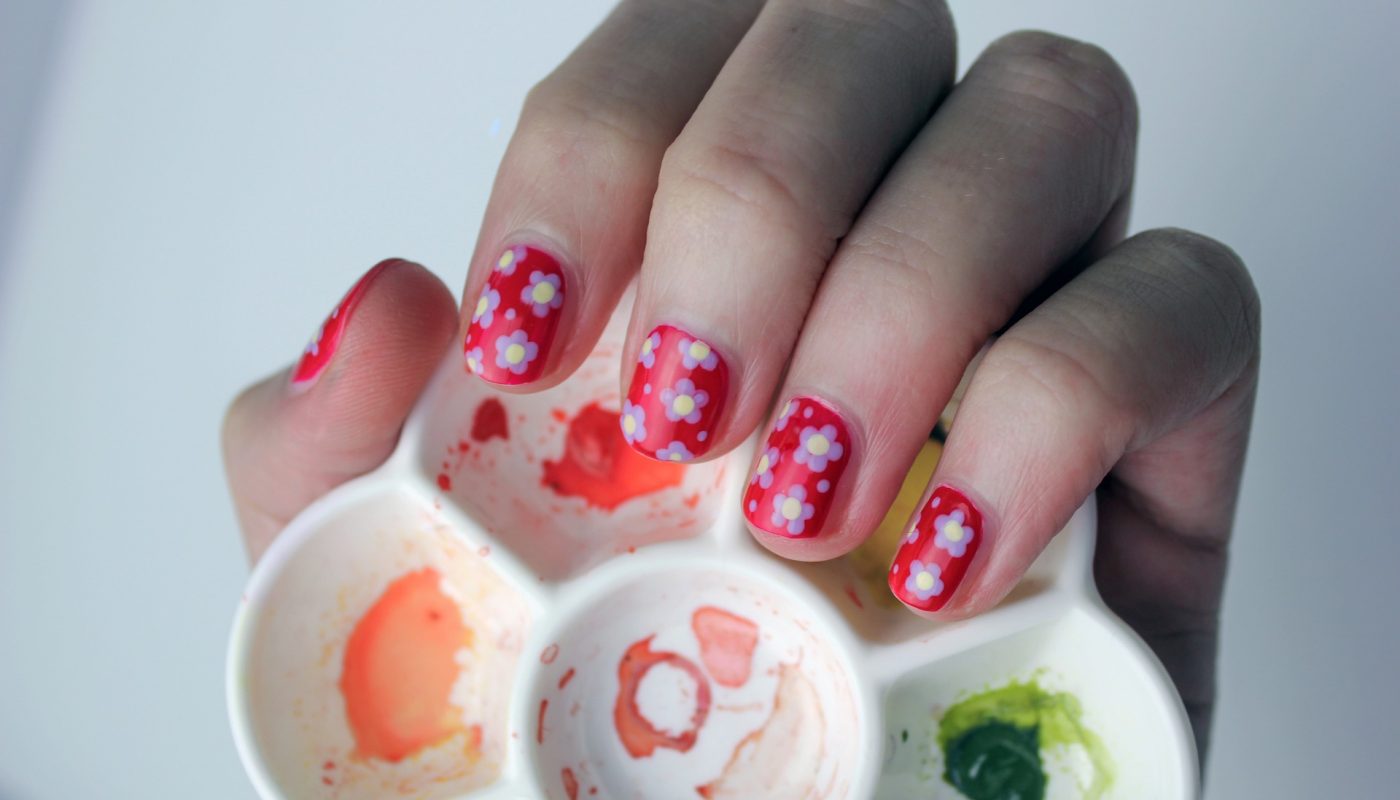
Nail art is a fascinating world where creativity knows no bounds. Each year brings fresh trends that redefine the art of nail decoration. In this comprehensive guide, we’ll dive into the latest nail art trends of 2023 and walk you through how to achieve them in the comfort of your own home. Get ready to transform your nails into stunning works of art.
Trend #1: Watercolor Nails
Embracing Watercolor Beauty
Watercolor nails are all the rage in 2023, offering a delicate and artistic appearance. Here’s how to make a splash with this trend:
- Preparation: Start with a white or light-colored base.
- Watercolor Magic: Dab various nail polish colors onto a sponge.
- Blending: Gently sponge the colors onto your nails, creating a watercolor effect.
- Top Coat: Seal your masterpiece with a clear top coat.
Pro Tip: Experiment with different color combinations for unique watercolor patterns.
Trend #2: Abstract Geometric Designs
Geometric Elegance
Abstract geometric nail art is a modern and chic trend. Here’s your roadmap to geometric greatness:
- Base Coat: Begin with your preferred base color.
- Shape It Up: Use thin brushes or tape to create geometric shapes.
- Color Magic: Fill in the shapes with contrasting colors.
- Top Coat: Finish with a clear top coat for a polished look.
Pro Tip: Practice your lines and angles for precise geometric patterns.
Trend #3: Gradient and Ombre Nails
The Art of Gradient
Gradient and ombre nails offer a stunning transition of colors. Here’s how to blend with perfection:
- Base Color: Apply your base color.
- Color Blend: Use a makeup sponge to blend multiple colors on your nails.
- **Seamless Transition
**: Blend until you achieve a smooth transition.
- Top Coat: Seal the gradient with a top coat.
Pro Tip: Start with colors that naturally blend, like shades from the same color family.
Trend #4: Nature-Inspired Nails
Nail Art in Bloom
Nature-inspired nail art connects you with the beauty of the outdoors. Try these designs:
- Base Coat: Begin with a base color that represents your chosen element of nature.
- Design Choices: Add flowers, leaves, or other natural elements with fine brushes.
- Color Palette: Use soft, earthy tones for a natural look.
- Top Coat: Preserve your nature-inspired art with a clear top coat.
Pro Tip: Study real plants and flowers for design inspiration.
Trend #5: Minimalist Nail Art
The Elegance of Minimalism
Minimalist nail art is all about understated beauty. Here’s how to achieve the simplicity:
- Base Coat: Choose a muted base color or leave your nails bare.
- Subtle Accents: Add minimalist designs like dots, lines, or a single accent nail.
- Less is More: Embrace the “less is more” philosophy for minimalist chic.
- Top Coat: A clear top coat adds a sleek finish.
Pro Tip: Use negative space for minimalist designs—it’s trendy and elegant.
Trend #6: 3D and Textured Nails
Nail Art with Depth
3D and textured nails add dimension to your manicure. Here’s how to make your nails pop:
- Texture Choices: Experiment with textured nail polishes, crystals, or nail stickers.
- Placement: Apply your chosen textures strategically for a 3D effect.
- Top Coat: Secure your textures with a clear top coat.
Pro Tip: Start with simple 3D designs and gradually explore more complex options.
Trend #7: Mix-and-Match Manicures
Unleash Your Creativity
Mix-and-match manicures combine various nail art styles for a personalized look. Here’s how to curate your unique style:
- Theme: Choose a theme or color palette that ties your designs together.
- Design Variety: Experiment with different patterns and styles on each nail.
- Balanced Chaos: Achieve a harmonious blend of designs across your nails.
- Top Coat: Seal your mix-and-match masterpiece with a clear top coat.
Pro Tip: Use a single color to unify your mix-and-match nails.
Trend #8: Foil and Metallic Accents
Shimmer and Shine
Foil and metallic accents bring shimmering sophistication. Here’s how to embrace the sparkle:
- Base Color: Begin with your base color.
- Foil Application: Apply foil or metallic accents strategically on your nails.
- Secure It: Seal your metallic designs with a clear top coat.
Pro Tip: Use tweezers for precise foil placement.
Trend #9: Negative Space Nails
Chic Negative Space
Negative space nail art is about elegant simplicity. Here’s how to embrace the trend:
- Base Coat: Apply a base color or leave areas of your nails bare.
- Design Choice: Create minimalistic designs within the negative space.
- Balance: Achieve a balanced look with open space and design.
- Top Coat: Finish with a clear top coat for durability.
Pro Tip: Negative space nails look stunning with a bold contrast.
Trend #10: French Tips Reinvented
Classic with a Twist
Reinvented French tips offer a modern twist on a classic look. Here’s how to revamp your tips:
- Base Color: Start with a neutral base or opt for a unique color.
- Tip Choice: Experiment with various tip shapes and colors.
- Accent Nails: Add accent nails for a contemporary flair.
- Top Coat: Seal your reinvented French tips with a clear top coat.
Pro Tip: Mix and match different tip styles for a trendy ensemble.
Trend #11: Retro Nail Art
Nostalgic Nail Vibes
Retro nail art embraces nostalgia with vintage-inspired designs. Here’s how to capture the essence of the past:
- Base Coat: Choose retro-inspired colors for your base.
- Retro Designs: Add classic patterns like polka dots, checks, or pin-up art.
- Detail Matters: Pay attention to small details for an authentic retro look.
- Top Coat: Preserve your retro vibes with a clear top coat.
Pro Tip: Research iconic retro design elements for inspiration.
Tools and Materials
To embark on your nail art journey, arm yourself with these essential tools and materials:
- High-quality nail polishes in a variety of colors.
- Fine brushes, dotting tools, and tape for precise designs.
- Nail polish remover and cleanup brushes for mistakes.
- Clear base and top coats for protection and longevity.
Tips for a Flawless DIY Manicure
Achieving professional-quality nail art at home is possible with these tips:
- Patience: Take your time with each step for the best results.
- Practice: Nail art improves with practice, so don’t be discouraged by early attempts.
- Sealing: Always seal your designs with a top coat to prevent chipping.
Exploring Your Creativity
Nail art is a canvas for your imagination. Experiment with these trends, mix and match techniques, and let your creativity flow. The possibilities are as endless as your ideas.
Conclusion
The latest nail art trends of 2023 offer a spectrum of creative possibilities for your nails. From watercolor elegance to retro nostalgia, these trends allow you to express your unique style and artistry. So, pick up your tools, unleash your creativity, and let your nails tell your story.
FAQs
- Q: Can I achieve these nail art trends with regular nail polish, or do I need special nail art products?
A: You can achieve most of these trends with regular nail polish, but nail art products like fine brushes and tapes can enhance precision. - Q: How long does it typically take to complete a DIY nail art design?
A: The time varies depending on the complexity of the design. Simple designs may take 30 minutes, while intricate ones can take a few hours. - Q: Are there any specific tools I should invest in for more complex nail art styles?
A: Fine brushes, dotting tools, and nail art tapes are useful for intricate designs. These tools provide more control and precision. - Q: Can I mix and match different nail art trends in a single manicure?
A: Absolutely! Mixing and matching trends can result in unique and eye-catching nail art. Let your creativity run wild. - Q: What should I do if I make a mistake while doing my DIY nail art?
A: Don’t worry; mistakes happen. You can use nail polish remover and a small brush to correct errors, or you can incorporate them into your design creatively.